Assalamualaikum wr wb
Pada kesempatan kali ini saya akan berbagi tutorial untuk Routerboard. Yap sesuai judul, saya akan membahas Identity, Management Service, dan Management User di Routerboard. Oke untuk lebih jelasnya mari simak postingan berikut.On this occasion I will share a tutorial for Routerboard. Yep according to the title, I will discuss Identity, Management Service, and User Management in Routerboard. Okay for more details, let's look at the following post.
A. Tujuan
A. Purpose- Dapat mengetahui cara mengubah identitas di Routerboard
- Knowing how to change the identity in the Routerboard
- Dapat memanajemen servis, dan user di Routerboard
- Can management service, and user in Routerboard
B. Bahan-bahan
B. Materials- 1 Unit PC / laptop
- 1 Unit PC / laptop
- Routerboard
- Routerboard
- Kabel UTP
- UTP cable
- Winbox
- Winbox
- Browser
- Browser
C. Langkah Kerja
C. StepsHubungkan Routerboard anda ke Laptop / PC dengan kabel UTP ke Ether2. Jika sudah, atur IP pada Laptop / PC anda sesuai dengan IP Address Routerboard anda (Defaultnya 192.168.88.1). Laptop saya menggunakan IP Address 192.168.88.2/24.
Connect your Routerboard to Laptop / PC with a UTP cable to ether2. If already, set the IP Address on Laptop / PC in accordance with the IP address of your Routerboard (default 192.168.88.1). My laptop using the IP address 192.168.88.2/24.


Buka winbox lalu klik "..." dan klik MAC Address routerboard untuk meremotenya. Lalu login menggunakan user "admin" dengan password kosong kemudian klik "Connect"
Open winbox then click "..." and click the routerboard MAC Address for remote. Then login using the user "admin" with empty password and click "Connect"

I. Mengubah Identitas Routerboard
I. Change Routerboard IdentityVia Winbox(GUI)
Jika sudah masuk ke Winbox, anda dapat mengubah identitas routerboard untuk memudahkan kita membedakan antar routerboard.
Klik " System -> Identity "
If you have entered into Winbox, you can change the identity routerboard to help us differentiate between routerboard.
Click " System -> Identity "

Lalu ubah identitas routerboard sesuai yang anda inginkan.(defaultnya: MikroTik)
Then change the routerboard identity as you want. (Default: MikroTik)

Maka identitas routerboard akan berubah.
Then routerboard identity will change.

Via Terminal(CLI)
Mengubah identitas routerboard juga dapat dilakukan melalui terminal dengan mengklik menu "New Terminal" pada Winbox. Untuk mengubah identitasnya ketikkan perintah:
Changing routerboard identity can also do with the terminal by clicking "New Terminal" on Winbox. To change the identity type the command:
system identity set name=nama_identitasMaka identitas routerboard akan berubah.
Then routerboard identity will change.

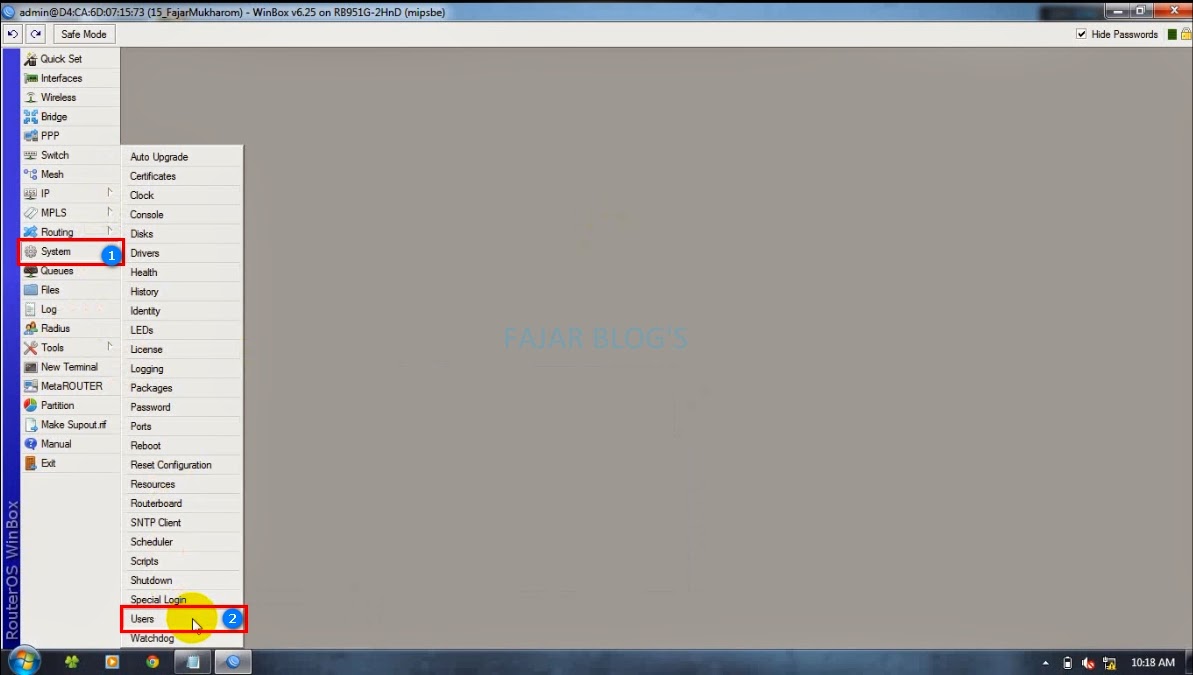
II. Manajemen User
II. Management UsersMembuat User Baru
Create new user
Manajemen user di mikrotik sangatlah mudah. Klik "System -> Users"
Users mikrotik management is so easy. Click the "System -> Users"
Pada tab Users, klik "+" untuk menambahkan user baru.
On the Users tab, click the "+" to add a new user.

Isikan nama, grup, dan password. Untuk grup pilih "full" agar mendapat akses penuh terhadap Routerboard. Lalu klik "Apply" dan "OK"
Fill in your name, group, and a password. For group select of "full" for full access to Routerboard. Then click "Apply" and "OK"

User baru telah terbuat. Keluar dari winbox untuk mencoba user baru.
The new user is created. Exit from Winbox to try a new user.

Buka winbox lalu klik "..." dan klik MAC Address routerboard untuk meremotenya.
Open winbox then click "..." and click the routerboard MAC Address for remote.

Isikan nama dan password sesuai user yang telah dibuat tadi. Lalu klik "Connect"
Fill in user name and password that was created earlier. Then click "Connect"

Membuat user "fajar" hanya dapat diakses oleh satu IP Address
Make the user "fajar" can only be accessed by a single IP Address
Klik "System -> Users"
Click "System -> Users"

Klik 2x pada user "fajar"
Double click on user "fajar"

Pada "Allowed Address" isikan IP Address yang diperbolehkan untuk mengakses Routerboard dengan user "fajar". Ini berfungsi untuk menghindari akses dari client lain dengan IP Address berbeda. Saya memberikan IP Address 192.168.88.3 yang hanya dapat login dengan user "fajar". Lalu keluar dari winbox.
In the "Allowed Address" enter the IP addresses that are allowed to access the Routerboard with user "fajar". This serves to prevent access from another client with a different IP address. I given the IP address 192.168.88.3 that can only login with user "fajar". Then exit from winbox.

Saya menggunakan IP Address 192.168.88.2.
I use the IP Address 192.168.88.2

Buka kembali winbox. Klik "..." lalu pilih IP Address untuk meremotenya.
Open winbox again. Click "..." then select the IP Address for remote.

Isikan nama dan password sesuai user "fajar". Lalu klik "Connect"
Fill in user name and password with user "fajar". Then click "Connect"

Maka akan eror dan tidak bisa login karena saya menggunakan IP Address 192.168.88.2. Sedangkan yang diperbolehkan login adalah IP Address 192.168.88.3.
It will be an error and can not log in because I use the IP address 192.168.88.2. While that is allowed to log in is the IP Address 192.168.88.3.

Saya merubah IP Address Laptop dari 192.168.88.2 menjadi 192.168.88.3 agar dapat mengakses routerboard menggunakan user "fajar"
I change the IP address from192.168.88.2 to 192.168.88.3 for access routerboard using the user "fajar"

Buka kembali winbox. Klik "..." lalu pilih IP Address untuk meremotenya.
Open winbox again. Click "..." then select the IP Address for remote.

Isikan nama dan password sesuai user "fajar". Lalu klik "Connect"
Fill in user name and password with user "fajar". Then click "Connect"

Maka akan berhasil masuk ke winbox dengan user "fajar" karena IP Address yang digunakan sesuai dengan IP Address yang diperbolehkan oleh user "fajar"
Then it will be successfully log in to Winbox with user "fajar" because the IP Address that is used accordance with the Allowed IP address by user "fajar"

II. Manajemen Servis
II. Management ServiceUntuk memanajemen servis yang ada, klik "IP -> Services"
To manage the available service , click the "IP -> Services"

Mematikan Servis
Disable Service
Matikan servis yang tidak digunakan dengan mengkliknya lalu pilih "x" (lihat gambar)
Turn off unused services by clicking on it and then select the "x" (see picture)

Mengubah Port Servis
Changing Port Services
Untuk mengubah port servis, klik 2x pada servis yang ingin diubah portnya. Disini saya akan mengubah port telnet.
To change the port service, double click on the service you want to change the port. Here I am going to change the telnet port.

Saya merubah port telnet dari port 23 menjadi port 8080. Lalu klik "Apply" dan OK"
I change port telnet from port 23 to port 8080. Then click "Apply" and OK"

Cek menggunakan command promt dengan mengetikkan perintah:
Checks using the command prompt by typing command:
telnet 192.168.88.1Maka telnet tidak bisa dibuka karena portnya telah diubah.
Then telnet can not be opened because the port has been changed.

Cek menggunakan PuTTy. Isikan IP Address 192.168.88.1 (nomor 1) dan Port 8080 (nomor 2) . Lalu klik "Open" (nomor 3)
Checks using PuTTy. Fill in the IP address 192.168.88.1 (number 1) and port 8080 (number 2). Then click "Open" (number 3)

Maka telnet dengan PuTTy berhasil karena port yang dimasukkan sesuai.
Telnet with putty work succesfull because the port is entered accordingly.

Menjalankan Servis dengan salah satu IP Address
Running the Service with one IP Address
Untuk menjalankan Servis dengan menggunakan salah satu IP Address, klik "IP -> Services"
To run the service by using one IP Address, click the "IP -> Services"

Saya akan membuat winbox hanya dapat diakses oleh salah satu IP Address. Klik 2x pada winbox.
I will make winbox only be accessed by one IP address. Double click on Winbox.

Pada kolom "Available from" isikan IP Address yang diperbolehkan untuk mengakses Routerboard menggunakan winbox.
In the "Available from" fill in the IP address are allowed to access the RouterBOARD using Winbox.

Then it will look like in the picture. That is winbox only be accessed by a computer that uses the IP address 192.168.88.3.

Saya menggunakan IP Address 192.168.88.3.
I using the IP address 192.168.88.3.

Buka kembali winbox. Klik "..." lalu pilih IP Address untuk meremotenya.
Open winbox again. Click "..." then select the IP Address for remote.

Isikan nama dan password. Lalu klik "Connect"
Fill in user name and password. Then click "Connect"

Maka akan berhasil masuk ke winbox karena saya menggunakan IP Address yang diperbolehkan untuk mengakses winbox yaitu 192.168.88.3
Then will succesfull log in to winbox because I use IP addresses that are allowed to access winbox 192.168.88.3

Selanjutnya saya merubah IP Address dari 192.168.88.3 menjadi 192.168.88.2.
Next I changed the IP address from192.168.88.3 to 192.168.88.2.

Remote menggunakan IP Address, dan isikan nama dan password. Kemudian klik "Connect"
Remote using the IP Address, and enter the name and password. Then click "Connect"

Maka akan ada peringatan eror karena IP Address yang digunakan tidak sesuai dengan IP Address yang diijinkan.
Then there will be a warning error because IP address does not match the IP address is allowed.

Untuk lebih jelasnya dapat dilihat dilihat pada video berikut.
Sekian semoga bermanfaat.
EmoticonEmoticon